Already have an idea for a website but don’t know how to host it?
In this step-by-step Hostinger blog, I’ll walk you through the setup process and show you exactly how to get your site online.
Whether you’re building an e-commerce store, portfolio, or blog, by the end of this guide you’ll know how to:
- Host your website with Hostinger
- Register your domain
- Build your site with Hostinger’s Website Builder or WordPress
- Upload an existing website if you already have one
Let’s dive in 🚀
Why Choose Hostinger?
When picking a web hosting provider, the main things to look for are:
- Price
- Reliability
- Ease of use
- Features included
After testing and research, Hostinger really stands out because it checks all these boxes.
Here’s why:
- Free website builder included
- Affordable hosting plans
- AI tools to make building even easier
- Free domain for the first year
- Unlimited bandwidth
- 24/7 customer support
Step 1: Pick the Right Hosting Plan
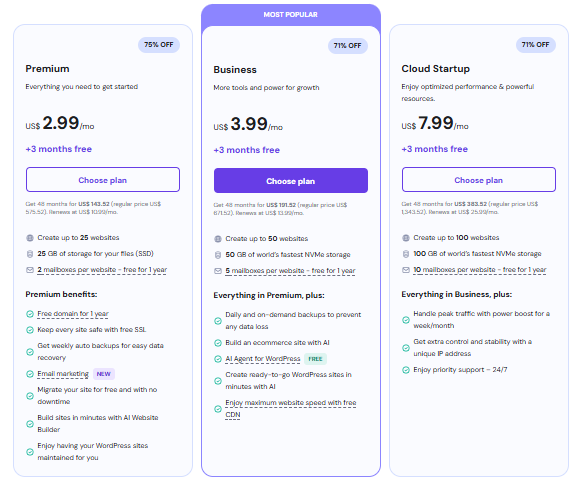
Hostinger has three plans, all of which include:
- Free Hostinger site builder
- Business email
- AI tools
- Strong security
- Unlimited bandwidth
- 24/7 support
👉 If you’re a beginner, the Premium Plan is a great starting point. Perfect for blogs, small businesses, or portfolios.
👉 If you want AI tools + e-commerce features + faster storage, I recommend the Business Plan. This one’s my favorite overall since it saves time with AI features.
Step 2: Choose Your Domain Name

With Hostinger, you’ll get a free domain name for the first year. Here’s what to keep in mind:
- Pick something short, simple, and brandable
- Add keywords related to your business or niche
- Stick with a .com if possible (best for credibility)
👉 Pro tip: Use Hostinger’s domain suggestion tool if your first choice isn’t available.
⚠️ Don’t forget to verify your domain. If you skip this step, your domain could be suspended within 15 days.
Step 3: Build Your Website
Now comes the fun part — creating your site. You’ve got two options:
Option 1: Hostinger Website Builder
- Over 150 responsive templates (business, e-commerce, portfolio, blogs)
- Fully customizable (colors, fonts, layouts)
- AI tools that generate About and Contact pages automatically
- Publish your site in just a few clicks
This is perfect if you’re new and want a no-stress solution.
Option 2: WordPress with Hostinger
- Create a WordPress site right inside Hostinger
- Choose plugins like Google Site Kit for analytics
- Pick themes like Astra for a clean design
- Full control over customizations
If you’re planning to blog long-term or add advanced features later, WordPress is a solid choice.
Step 4: Upload an Existing Website (Optional)
https://youtu.be/yvzsqwmlltI?si=H4UiuLNrxkyLn2KD
Already have a site? You can upload it directly:
- Use Hostinger’s Import Website feature in hPanel
- Upload your site archive to the public_html directory
- If your site uses a database, create a new MySQL database and user, then import via phpMyAdmin
- Update your configuration files (like
wp-config.php) with the new details
Once everything is set up, test your domain. Keep in mind DNS updates can take up to 48 hours to fully propagate.
Step 5: Test & Troubleshoot
- Check if your website loads by typing in your domain
- If DNS isn’t ready, use whatsmydns.net to track propagation
- If something breaks, use:
- Hostinger live chat support
- Hostinger Help Center
- AI troubleshooting tools
Final Thoughts
Hosting your website with Hostinger is straightforward, affordable, and beginner-friendly.
Here’s a quick recap:
- Choose a hosting plan (Premium or Business recommended)
- Register your free domain
- Build your site with Hostinger Website Builder or WordPress
- Upload an existing site if you already have one
- Publish and start growing your online presence
👉 Don’t forget: Use my special discount link to get the best deal.
Happy hosting, and I wish you all the best with your new website!
Pingback: How I Make Over $23,000/Month With Pinterest Affiliate Marketing (And How You Can Copy My Strategy) - wellthwise360